Beginner-friendly introduction to DevOps with Docker on Windows
I decided to keep my new laptop clean. Don’t want to install any DB, framework, or DevOps software. And then I found out about Docker and how easy it is to work with it. This introduction follows my first steps and the reason for implementing a development environment based on Docker Compose.
I decided to keep my new laptop clean. Don’t want to install any DB, framework, or DevOps software. And then I found out about Docker and how easy it is to work with it. This introduction follows my first steps and the reason for implementing a development environment based on Docker Compose.
1. Introduction
A while ago I got a new laptop. I decided to keep it clean and don’t want to install every DB, framework, or any other thing on it. So I was working on a nice solution for this purpose. At first, I had a look at vagrant because I already know it…
It is nice and I can do many things with it. So I start using it again. BUT the problem was that I cannot convert easily from development to production. Now I got a problem and I remembered why I stop using vagrant a while ago…
BUT THEN something happens. My brain starts remembering about this container stuff… WHICH could also be used in a production environment. AWESOME!
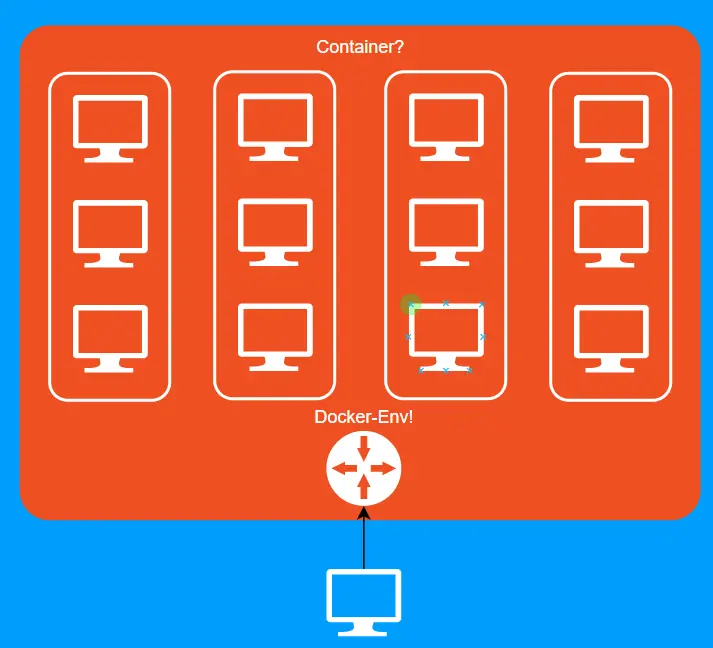
And then I was like,… SHIT, I am using windows…. DOH… can I use docker? And how?.. So I was thinking about my PC which has a docker environment and within that, some containers are simpler PCs and have all the development stuff on them. And I can create containers within containers and everything is managed by Docker. THIS WAS SO NICE IN MY BRAIN.
And after that, I came up with a graphic that looks nice. I know everything is wrong but I had this idea to have an environment like this...
Then I want to start with Docker... BUT SUDDENLY…..
……
…

The first problem was that I never really used docker before and does not know where to start. So I tried to find tutorials and I found many of them, really a lot… And I learned about the things I can do with Docker.
After an initial search, I decided which things I want to do first: I want to find out how a beginner can install his own docker development environment WITHOUT having ANY knowledge about Docker, Docker-Compose, etc…
Unfortunately, no tutorial showed everything and explained everything I want to know. So I watched videos and researched on GitHub to gather all information I need to build my own personal docker development environment which can easily be transferred to production...
Within the next steps, I will explain what I found and how everyone can achieve this. I try to explain everything as simply as possible. So every person who has any experience will ask me WHY. But I will not answer….
2. Installing Docker-Desktop
The first thing was very easy. I downloaded Docker Desktop for Windows (here) and install it on my System. I am using Windows Pro so there were no problems installing (could be problems while using Home Edition).
3. Now I need something
After installation, I switched to https://docs.docker.com/get-started/ and try to follow the instructions mentioned there. For me, it was the wrong place to start. I got more questions while following the tutorial than they could answer. So I tried another approach.
Very important to know is that I heard people talking about docker-compose and how much better it is as standard Dockerfile because you can put Docker container into services...
With this in mind, I started a google search to find docker-compose files. I want to extract information/commands/settings from working docker-compose services.
4. Weird Problems…
I learned many things while searching for docker-compose files. Nothing of them was really interesting for developers who only want to develop a NODEJS-backend for example. So I won't mention them...
Because I am working with windows and have more than one HDD I learned a very important thing!
Docker-Desktop is installed within the C:/Users folder which I really find annoying... So I have to move it… The problem was…many websites suggest you can switch it within Docker-Desktop settings...
BUT NOONE SAID THAT ONLY WORKS IF YOU USE THE OLD HYPER-V Mode which does not exist in my Docker-Desktop environment…
Because I am using a new release of Docker-Desktop it uses the WSL now (Windows Subsystem For Linux). And because of this images are stored within this subsystem. To move them you have to move the WSL save path.
To make things short you have to do, go to a windows shell (you can use VSCode and add an extension called Remote — WSL) and do:
- check which wsl images you have installed:
$> wsl -l -v
 NAME STATE VERSION
 docker-desktop Running 2
 docker-desktop-data Running 2
2. Export, Unregister, and reimport into a new location (docker-desktop)
$> wsl --export docker-desktop docker-desktop.tar
$> wsl --unregister docker-desktop
$> wsl --import docker-desktop X:\NEWLOCATIONHERER\ docker-desktop.tar --version 2
I suggest moving all images to an HDD which has much space on it. You have to redo step 2 for every image you find in step 1. (on my machine it was docker-desktop and docker-desktop-data)
5. Finally start doing stuff
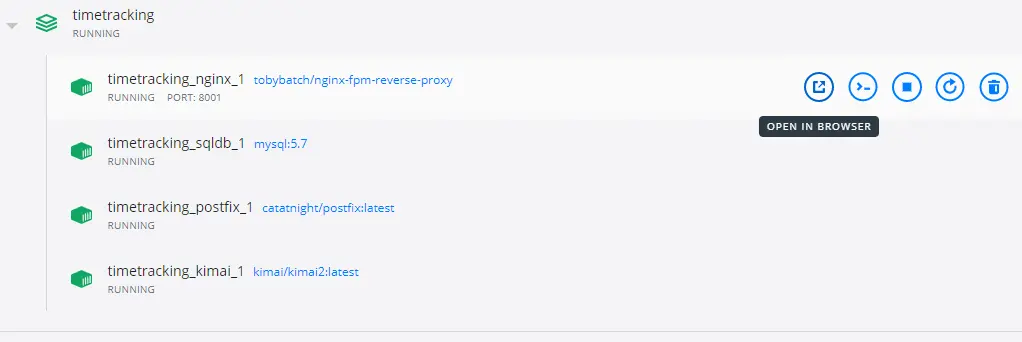
So the first thing I want to try installing was a time tracking app called kimai which I know works in docker (because I checked on the website for docker stuff — see here)
So I created a new folder (named it timetracking) and downloaded the docker-compose.yml file (this one) into it. After that I switched to a terminal and run:
$> docker-compose up -dthe first time I used without -d and then I stays open and I could not use the terminal anymore. so I canceled it and started it with this parameter (it means detached)
AND NOW MAGIC... I’ve got my first dockerized app running on my machine.. HOOOOOORAAAY … but how can I access it?
To access the app I switched to a browser and entered http://localhost:8001 because I saw within the docker-compose file that at some point there was an option that says:
ports:
      - 8001:80
Because I am a good engineer I know that this means port 8001 is 80 within docker!
Another way to visit the app is to open it with docker-desktop. This is possible because after you execute docker-compose up -d and everything works fine the new container is visible there and you can simply press Open in Browser EASY!
And then I was like… I'M A DOCKER EXPERT…!
And shortly after that, I was wondering… where is the database stored ..why can’t I find it?? WHAT IS HAPPENING?
So I had a look at the docker-compose file and found within the sqldb-service this part:
volumes:
      - mysql:/var/lib/mysql
This leads to the creation of a new folder within my timetracking folder which was called kimai2_db and contained the whole important MySQL data.
YEAH, AWESOME!
So now I am safe to work on it (earlier I destroyed it so many times and was frustrated because my data wasn’t saved as I want to…)
The last thing I did was prune the docker-compose file because I found it full of unimportant stuff which I did not need on my local machine for my time tracking stuff and came up with:
version: '3.5'
services:
  sqldb:
    image: mysql:5.7
    environment:
      - MYSQL_DATABASE=kimai
      - MYSQL_USER=kimai
      - MYSQL_PASSWORD=kimai
      - MYSQL_ROOT_PASSWORD=kimai
    volumes:
      - ./kimai2_db:/var/lib/mysql
    command: --default-storage-engine innodb
    restart: unless-stopped
  nginx:
    image: tobybatch/nginx-fpm-reverse-proxy
    ports:
      - 8001:80
    volumes:
      - public:/opt/kimai/public:ro
    restart: unless-stopped
    depends_on:
      - kimai
  kimai:
    image: kimai/kimai2:latest
    environment:
      - APP_ENV=prod
      - TRUSTED_HOSTS=localhost
      - ADMINMAIL=medium@knulst.de
      - ADMINPASS=changemeplease
      - DATABASE_URL=mysql://kimai:kimai@sqldb/kimai
      - TRUSTED_HOSTS=nginx,localhost,127.0.0.1
    volumes:
      - public:/opt/kimai/public
    restart: unless-stopped
volumes:
    public:
And now this docker container is ready to use. If I want to copy it to another machine I only zip the timetracking folder put it on a USB stick and “reinstall” it (by executing docker-compose up -d).
The best thing is that I don’t have to reinstall everything, exporting importing the database, etc….
6. Make my Dev-Env work!
Now I want my own docker container! And the first thing I do was copy stuff from the time tracking one.
That’s how my first prototype of the docker-compose looked:
version: '3'
services:
  mysql:
    environment:
      MYSQL_DATABASE: nodeappdb
      MYSQL_PASSWORD: nodeapppw
      MYSQL_ROOT_PASSWORD: hellosupersafepasswordforroot
      MYSQL_USER: nodeappuser
    image:  mysql:5.7
    volumes:
      - ./db:/var/lib/mysql
I extracted the DB part, and change the name into mysql and changed the pw/user/db entries.
Then the real work begins. I wanted to have a dev environment where I can develop node apps. So I needed a node container... Normally it is possible to add another service into the docker-compose file which is based on any node image and you have your dev env.
But there was a big problem for me. I wanted to have an environment where I can develop on my own machine which is directly transported into the docker container without rebuilding the image or doing something within a terminal.
So I searched and try to gather information about this live reload thing.
After some time I finally finished my docker-compose file which will be explained in detail to everyone!
version: '3.4'
services:
  mysql:
    environment:
      MYSQL_DATABASE: nodeappdb
      MYSQL_PASSWORD: nodeapppw
      MYSQL_ROOT_PASSWORD: hellosupersafepasswordforroot
      MYSQL_USER: nodeappuser
    image:  mysql:5.7
    command: "--lower_case_table_names=1 --max-allowed-packet=33554432"
    networks:
      - default
    volumes:
      - ./db:/var/lib/mysql
  node:
    ports:
      - 3000:3000
    healthcheck:
      test: ["CMD-SHELL", "curl -f http://localhost:3000/healthcheck || exit 1"]
      interval: 30s
      timeout: 10s
      retries: 2
      start_period: 10s
    environment:
      - NODE_ENV=development
      - BASEAPI_ENV=development
      - BASEAPI_PORT=3000
    build: .
    depends_on:
      - mysql
    command: /command.sh
    volumes:
      - ./src/:/usr/src/app/
      - ./node_modules:/usr/src/app/node_modules
      - ./command.sh:/command.sh
    networks:
      - default
networks:
  default:
Line 3–14:
This is the MySQL container defined earlier. I made two additions. The first thing is a command which is used to define settings for MySQL if you connect. The other thing is networks which is only used to put different services into the same network so that they can communicate with each other
Line 15:
This line defines the node service
Line 16–17:
As mentioned earlier this line is used to make the port available outside of the docker environment. This enables the functionality to access the machine from outside the container (my local machine) through http://localhost:3000
Line 18:
This time I wanted to have a health check. It is an automated script which is executed how I define
Line 19–23:
Contains the command (test) which should be executed. The other parameters are used for defining an interval (interval) when the command should be executed, after how many seconds it should timeout (timeout) and how often it could fail (retries) before it stops running. Also, there is a starting time (start_period) after which the server is started
Line 24–27:
This part defines environment variables that can be used within the container. I used three different variables which I normally use on my local machine. They can be named whatever you want.
Line 28:
This is a very interesting part. While researching I found out that you can use a Dockerfile to build a personalized image which can then be used in a docker-compose file. With this line, I inform docker-compose about a Dockerfile within the same directory that should be used to build the image (as you maybe noticed no image is used in node)
Line 29–30:
Another really important part of the file. This line specifies that the `node` container should start AFTER MySQL is started. This is really important if you have a node app that connects to the MySQL server after starting. In my app after starting the node app, it synchronizes the models with the database which isn’t possible if the MySQL services are not started. This would result in an error and not starting container
Line 31:
A really important command which is executed for my environment which I will explain later
Line 32:
Start of volume creation
Line 33:
Maps the local subfolder src to /usr/src/app within the docker container
Line 34:
Maps the local subfolder node_modules to /usr/src/app/node_modules. This is done to have the node_modules within the docker container but not within the local src folder (awesome magic!!)
Line 35:
Maps the command.sh to the container so it is used there
Line 36–37:
Uses the same network as the MySQL container. It would do the same if we leave it out but I put it in if I want to have more services in the future which should be in different networks
Line 38–39:
important because the network was used earlier
As mentioned in the explanation above I used build: . within the docker-compose file which indicates that there is a Dockerfile to build the image which is used for the node-container. This is the file I used (will also be explained in detail):
FROM node:8.6

# Install app dependencies
RUN mkdir /build-dir
WORKDIR /build-dir
COPY ./src/package.json /build-dir
RUN npm install -g nodemon
RUN npm install

# Create app directory
RUN mkdir -p /usr/src/app
WORKDIR /usr/src/app
RUN ln -s /build-dir/node_modules node_modules

# Bundle app source
COPY ./src/ /usr/src/app/

EXPOSE 3000
CMD [ "npm", "run", "debug" ]
Line 1:
This is the base image that I want to use. If this is the only line within the Dockerfile I would have used image: node:8.6 directly within the docker-compose file
Line 3:
Just a comment
Line 4:
This line creates a new folder within the container
Line 5:
The working directory for the following commands is set to /build-dir
Line 6:
The package.json file HAS TO BE within the ./src folder on the local machine is copied to the build-dir within the container
Line 7–8:
Two commands will be executed within the container. The first one installs nodemon globally. The other one will install every other package from the package.json.
Line 9–10:
nothing important / comment
Line 11:
The app directory will be created within the container
Line 12:
The working directory for the following commands is set to /usr/src/app
Line 13:
This IMPORTANT step is used to create a soft link between the node_modules folder within the /usr/src/app folder and the node_modules folder within build-dir where npm install put in all use packages by the app
Line 14–15:
Just a comment
Line 16:
The LOCAL src folder will be copied into /usr/src/app
Line 17:
space
Line 18:
Exposes the port 3000
Line 19:
This command starts the node server. It executes npm run debug. This will only work if the package.json contains a script called debug. This HAS TO BE there. And because we use nodemon it should be: nodemon — legacy-watch server.js where server.js is your node-app-entrypoint
At last, I have this weird command.sh file which is used in node-service within docker-compose:
#!/bin/bash
cp -r /build-dir/node_modules/ /usr/src/app/
exec npm run debug
This command is really simple but is used to copy node_modules and every subfolder to the /usr/src/app. I have done this because I don’t want to have node_modules within the local src folder while developing.
7. THE DEV ENV IS FINALLY READY!
Now I can save these files into a new folder and put my node code within src and it works. And if I change something within the files they will be directly affected within the docker-container. THIS IS REALLY AWESOME!
8. Closing Notes
I LOVE DOCKER!
I am not 100% sure if this document is perfectly researched and if every command/settings I used is necessary. But it works and is a good starting point for further improvement of docker!
One really important thing I want to add is that my local src folder is mapped to /usr/src/app/ which I found annoying because in my head it is /usr/src/src/ and I will change it as soon as finishing this sentence!
Feel free to connect with me on Medium, LinkedIn, and Twitter.
🙌 Support this content
If you like this content, please consider supporting me. You can share it on social media, buy me a coffee, or become a paid member. Any support helps.
See the contribute page for all (free or paid) ways to say thank you!
Thanks! 🥰