
Use Varnish HTTP Cache And Docker To Boost Website Speed
Install Varnish HTTP Cache With Docker in Docker Swarm environment to increase website or blog performance by 20%.
In an attempt to boost the performance of my blog and improve the user experience for my visitors I decided to look for an opportunity to integrate an HTTP cache into my Docker Swarm environment.
After researching for a long time and also asking other people on Reddit (Unfortunately, no one could help me) I find a solution that fits my expectations.
While researching I learned about Varnish which is a web application accelerator that is also known as a caching HTTP reverse proxy. It can be installed in front of any server that uses HTTP to cache the contents. It is really, really fast and normally speeds up delivery with a factor of 300 - 1000x, decreases load times, and can handle traffic peaks.
A high-level overview of what Varnish does can be seen in this video:
The Setup
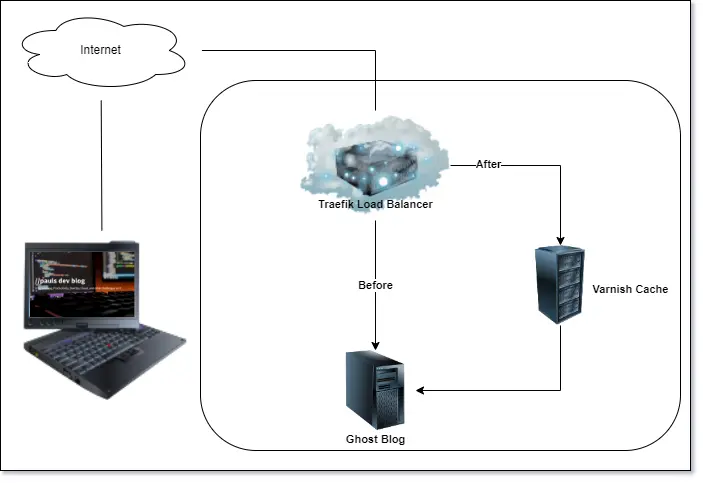
My new setup includes a Varnish HTTP Cache server which is deployed using Docker in my Docker Swarm environment. It is positioned between my Traefik Proxy and my Ghost blog. In this setup, Varnish is used to cache a wide range of static content on the page such as JavaScript, CSS, Images, and text files.
Benchmarking
To benchmark my website I use the Lighthouse extension from Google, giftofspeed.com, and tools.pingdom.com. All test sites load the entire site as if we're in the browser. I ran different tests from different countries with Varnish enabled and without. While testing I could see a performance increase by ~20%.
For example, on giftofspeed.com I tested the same URL several times with and without Varnish HTTP Cache enabled and got the following results:
Without Varnish HTTP Cache:

With Varnish HTTP Cache:

Set It Up For Yourself
First, ensure you have docker and docker-compose installed. Also, you need a Traefik Load balancer that forwards requests to my Ghost blog. All rules (labels) within the Compose file will be based on my personal Traefik installation.
Now, to set up a Varnish HTTP Cache between my Ghost blog and Traefik Proxy I extend the Compose file for this blog (read about how I set it up here) by first adding a varnish section and then moving all labels from my ghost service to the varnish service. Then I change the load balancer server port from 2368 (Ghost port) to 80 (varnish port). Another necessary change is that networks for the ghost service is changed in that it only has default and the varnish service has default and traefik-public. The last change will be adding a config to the Compose file which will contain the Varnish Config.
The resulting part of the Compose file will look like this:
  varnish:
    image: varnish:stable
    container_name: varnish
    restart: unless-stopped
    configs:
      - source: varnish_cfg
        target: /etc/varnish/default.vcl
    networks:
      - default
      - traefik-public
    deploy:
      labels:
        - traefik.enable=true
        - traefik.docker.network=traefik-public
        - traefik.constraint-label=traefik-public
        - traefik.http.routers.blogs-knulst-http.rule=Host(`www.knulst.de`) || Host(`knulst.de`) || Host(`blog.knulst.de`)
        - traefik.http.routers.blogs-knulst-http.entrypoints=http
        - traefik.http.routers.blogs-knulst-http.middlewares=https-redirect
        - traefik.http.routers.blogs-knulst-https.rule=Host(`www.knulst.de`) || Host(`knulst.de`) || Host(`blog.knulst.de`)
        - traefik.http.routers.blogs-knulst-https.entrypoints=https
        - traefik.http.routers.blogs-knulst-https.tls=true
        - traefik.http.routers.blogs-knulst-https.tls.certresolver=le
        - traefik.http.routers.blogs-knulst-https.tls.options=mintls12@file
        - traefik.http.services.blogs-knulst.loadbalancer.server.port=80
        - traefik.http.middlewares.redirect-blogs-knulst.redirectregex.regex=^https://blog.knulst.de/(.*)
        - traefik.http.middlewares.redirect-blogs-knulst.redirectregex.replacement=https://www.knulst.de/$${1}
        - traefik.http.middlewares.redirect-blogs-knulst.redirectregex.permanent=true
        - traefik.http.middlewares.redirect-blogs-knulst-nosub.redirectregex.regex=^https://knulst.de/(.*)
        - traefik.http.middlewares.redirect-blogs-knulst-nosub.redirectregex.replacement=https://www.knulst.de/$${1}
        - traefik.http.middlewares.redirect-blogs-knulst-nosub.redirectregex.permanent=true
        - traefik.http.routers.blogs-knulst-https.middlewares=redirect-blogs-knulst, redirect-blogs-knulst-nosub
configs:
  varnish_cfg:
    file: ./default.vcl
Within the ghost service we defined a config pointing to a default.vcl which will look like this:
vcl 4.0;

backend default {
    .host = "ghost:2368";
}
sub vcl_recv {
    # Do not cache the admin and preview pages
    if (req.url ~ "^/ghost($|/.*)" ||
        req.url ~ "^/p($|/.*)" ||
        req.url ~ "^/admin($|/.*)" ||
        req.url == "/"
        ) {
           return (pass);
    }
    if (req.url ~ "testclear") {
        ban("req.http.host == knulst.de");
        return(synth(200, "Cache was cleared by Rest call"));
    }
}
Within this file I declared some special rules for the Varnish HTTP cache:
- Set the
backendto ghost:2368 because within the internal default network ghost is reachable overghost:2368. - Remove
/ghost/...,/p/..., and/admin/...from the cache because the admin menu should not be cached. - Remove the root URL of this blog to never have an outdated list of articles because of caching.
- Add an URL (
/testclear) to manually clear the cache. Should be remove in production!
I create the Varnish configuration file (default.vcl) within the same folder as the docker-compose.
Now, I could deploy the complete Compose file that you can download on GitHub Gist with this command:
$ docker stack deploy -c docker-compose.yml blogIf you want to use it, please update the Host, the database (MySQL), and the mail settings.
Error Handling
Adjusting Varnish Config
If I ever want to change the Varnish config it is necessary to change the config name due to the fact that you cannot change configs within a Docker environment. You can easily change it to a new name in the Compose file, deploy it, and then delete the old key to alter between two config names.
Afterward, you have to reload the config because it will not be applied automatically. To do this I switched to the server where my Varnish container is deployed and use docker exec to reload the Varnish config:
$ docker exec YOUR_VARNISH_CONTAINER varnishreloadThe downloaded file does not work
If you blindly downloaded the file within the GitHub Gist it won't work without setting the needed variables for Mail, Mysql, and Host. Have a look at this tutorial explaining Ghost setup with Docker. Also, adjust the Mysql settings because the tutorial for Ghost was created before switching to MySQL and this part is missing. But, I am working on a simple How-To which will be published in some weeks.
Closing Notes
Congratulations if you followed my approach you have just installed your own Ghost blog with a Varnish HTTP Cache which will improve the performance!
The full Compose file can be found within the GitHub Gist I created for this article. If you still have questions about setting up a Ghost blog you can follow my tutorial about doing this in Docker Swarm.
This is the end of this tutorial. Hopefully, you are now able to set up your personal installation. If you enjoyed reading this article consider commenting your valuable thoughts in the comments section. I would love to hear your feedback about Varnish HTTP Cache. Furthermore, share this article with fellow bloggers to help them to boost their blog performance!
Feel free to connect with me on Medium, LinkedIn, Twitter, and GitHub.
🙌 Support this content
If you like this content, please consider supporting me. You can share it on social media, buy me a coffee, or become a paid member. Any support helps.
See the contribute page for all (free or paid) ways to say thank you!
Thanks! 🥰