How To Install Docker Without Docker Desktop On Windows
Also, learn how to use Portainer as an alternative Docker GUI to Docker Desktop.
As a developer who switched from Linux to Windows because of many reasons, I have used Docker Desktop for several months now because it updates my Docker environment automatically.
Unfortunately, this is not possible anymore and I have to remove Docker Desktop.
Luckily I did not use Docker Desktop for any commands or functionality except for updating the Docker engine so this change will not affect my workflow.
Why Should You Install Docker Without Docker Desktop?
Docker updated its Docker Desktop License Agreement and permit the professional use of Docker Desktop in large organizations without having a paid Docker subscription. This means that if your company has 250+ employees or more than $10 million in annual revenue you will not able to use Docker Desktop without a paid subscription. It remains free for smaller companies, private use, open-source projects, and educational purposes.
This license update is only related to Docker Desktop and not to Docker or the Docker Engine. This enables you to still use Docker for development and all types of environments, including the production ones. Normally, this license update does not impact your company’s business if working with Docker.
Prerequisites
To follow this How-To you need to have a WSL2 compatible workstation like Windows 10 version 2004 or higher. To check which version is installed press Windows logo key + R and press Enter to show your system settings. If you do not meet the requirement please update your Windows.
If Docker Desktop is installed you have to uninstall it
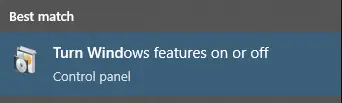
In Windows, the Linux Subsystem has to be enabled. This can be done by pressing the Windows log key, typing “Turn Windows features on and off” and open it.
Scroll to the bottom and activate the feature if it is deactivated.
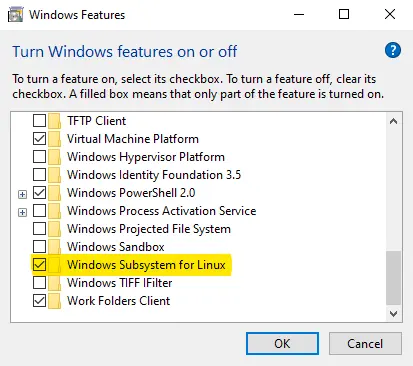
After activating press OK and restart your computer.
You can also install the Linux Subsystem with a PowerShell command:
Enable-WindowsOptionalFeature -Online -FeatureName Microsoft-Windows-Subsystem-Linux
Install Ubuntu on WSL2
After you set up the prerequisite you have to open a PowerShell with administrative privileges and install Ubuntu in WSL2 with the following command:
wsl --set-default-version 2
wsl --install -d Ubuntu
You can also install different Linux submodules within this step.
After the installation is finished you should check if Ubuntu was installed in the correct version:
wsl -l -vIf everything worked correctly you should see your installed Ubuntu with the corresponding WSL version. If the version is not correct you can change it with:
wsl --set-version Ubuntu-YY.MM 2YY.MM is the version of the Ubuntu version that you installed recently.
Install Docker
To install Docker on Windows within the Ubuntu submodule you can follow the official steps for installing Docker on Ubuntu:
Another way will be to create a new file and copy the following script into it. These commands are only copied from the official tutorial into a file to share with fellow developers
#/bin/bash

# 1. Required dependencies
sudo apt-get update
sudo apt-get -y install apt-transport-https ca-certificates curl gnupg lsb-release

# 2. GPG key
curl -fsSL https://download.docker.com/linux/ubuntu/gpg | sudo gpg --dearmor -o /usr/share/keyrings/docker-archive-keyring.gpg

# 3. Use stable repository for Docker
echo \
  "deb [arch=$(dpkg --print-architecture) signed-by=/usr/share/keyrings/docker-archive-keyring.gpg] https://download.docker.com/linux/ubuntu \
  $(lsb_release -cs) stable" | sudo tee /etc/apt/sources.list.d/docker.list > /dev/null

# 4. Install Docker
sudo apt-get update
sudo apt-get -y install docker-ce docker-ce-cli containerd.io

# 5. Add user to docker group
sudo groupadd docker
sudo usermod -aG docker $USER
Switch to your Ubuntu submodule within PowerShell and execute the file to install Docker and the needed dependencies.
You can now start and check if everything runs correctly with:
sudo service docker start   # start the engine
sudo service docker status  # print some nice status information
docker run hello-world      # run a test docker container
After the last command finish, you should see the running Docker image output:
Hello from Docker! This message shows that your installation appears to be working correctly.

To generate this message, Docker took the following steps:

The Docker client contacted the Docker daemon.
The Docker daemon pulled the "hello-world" image from the Docker Hub. (amd64)
The Docker daemon created a new container from that image which runs the executable that produces the output you are currently reading.
The Docker daemon streamed that output to the Docker client, which sent it to your terminal.
To try something more ambitious, you can run an Ubuntu container with: $ docker run -it ubuntu bash

Share images, automate workflows, and more with a free Docker ID: https://hub.docker.com/

For more examples and ideas, visit: https://docs.docker.com/get-started/
Common Problems with Ubuntu WSL2 Distro
If you install Ubuntu as your WSL2 Distro and use at least one that is based on Ubuntu Hirsute Hippo (21.04) it could happen that your docker daemon will not start correctly.
When trying to run dockerd it will produce the following error log:
...
INFO[2021-09-25T15:06:20.839195000+08:00] Loading containers: start.
INFO[2021-09-25T15:06:20.885624800+08:00] stopping event stream following graceful shutdown  error="<nil>" module=libcontainerd namespace=moby
INFO[2021-09-25T15:06:20.885865900+08:00] stopping healthcheck following graceful shutdown  module=libcontainerd
INFO[2021-09-25T15:06:20.886012400+08:00] stopping event stream following graceful shutdown  error="context canceled" module=libcontainerd namespace=plugins.moby
failed to start daemon: Error initializing network controller: error obtaining controller instance: unable to add return rule in DOCKER-ISOLATION-STAGE-1 chain:  (iptables failed: iptables --wait -A DOCKER-ISOLATION-STAGE-1 -j RETURN: iptables v1.8.7 (nf_tables):  RULE_APPEND failed (No such file or directory): rule in chain DOCKER-ISOLATION-STAGE-1
 (exit status 4))
I noticed that iptables being used by docker is a nftables version. This led to an error because starting from version 20.10 Ubuntu switched the firewall system to nftables (you can read about it on this website). Unfortunately, using nftables natively requires Linux Kernel 5.8 but the latest Kernel version for the WSL is 5.4.
Luckily, Ubuntu still has the possibility to use a legacy version of iptables by simply executing:
$ sudo update-alternatives --config iptables

There are 2 choices for the alternative iptables (providing /usr/sbin/iptables).

  Selection    Path                       Priority   Status
------------------------------------------------------------
* 0            /usr/sbin/iptables-nft      20        auto mode
  1            /usr/sbin/iptables-legacy   10        manual mode
  2            /usr/sbin/iptables-nft      20        manual mode

Press <enter> to keep the current choice[*], or type selection number: 1
update-alternatives: using /usr/sbin/iptables-legacy to provide /usr/sbin/iptables (iptables) in manual mode
After updating the iptables just restart the Docker daemon and you will notice that Docker starts working correctly.
Install Docker Compose
Installing Docker Compose can be done within the Ubuntu submodule. Open a PowerShell window and switch to the Ubuntu submodule. Then download the latest release from GitHub:
sudo curl -L https://github.com/docker/compose/releases/download/2.4.1/docker-compose-`uname -s`-`uname -m` -o /usr/local/bin/docker-composeNext, grant privileges for execution to the docker-compose command:
sudo chmod +x /usr/local/bin/docker-composeAfterward, you can test the functionality by executing docker-compose -version within the Ubuntu submodule or wsl docker-compose -version from any PowerShell window.
How To Integrate Docker And Docker Compose Into Your PowerShell
If you follow the tutorial you should have:
- WSL2 Linux subsystem installed
- Installed & configured Docker on Ubuntu
- Installed Docker Compose
You are able to use all Docker commands inside your Ubuntu submodule and also within a PowerShell by preceding the command with wsl:
wsl docker ps
wsl docker-compose -version
For convenience, you should be able to use any Docker command without adding wsl in front of it. To achieve this you can create an alias for your PowerShell. Read about it here and set up everything.
Then find your PowerShell profile
echo $PROFILEand open this file in an editor and paste this content:
Function Start-WslDocker {
    wsl docker $args
}

Function Start-WslDockerCompose {
    wsl docker-compose $args
}

Set-Alias -Name docker -Value Start-WslDocker

Set-Alias -Name docker-compose -Value Start-WslDockerCompose
Save the file and restart your PowerShell terminal to test if the alias is working by typing:
docker ps
docker-compose -version
If you don’t get an error it works as expected.
Installing Portainer
To better replace Docker Desktop and have something like a Docker GUI you should install Portainer in your local environment.
Portainer is a powerful, GUI-based Container-as-a-Service solution that helps organizations manage and deploy cloud-native applications easily and securely.
With Portainer you can:
- Deploy applications with defined app templates (Click to Deploy)
- Deploy and Manage Stacks from Compose files, including deploying directly from the git
- Deploy & Manage Containers, including the ability to edit a running container
- Pull/Push/Build Images
- Create Networks
- Create/Delete Volumes
- See a log of Docker Events
- See docker engine (Host) information, and apply security controls should you desire
This Docker Compose file can be used to install Portainer CE as a Docker service that automatically is restarted if it is not running.
version: '3'

services:
  portainer:
    image: portainer/portainer-ce:latest
    container_name: portainer
    restart: unless-stopped
    security_opt:
      - no-new-privileges:true
    volumes:
      - /etc/localtime:/etc/localtime:ro
      - /var/run/docker.sock:/var/run/docker.sock:ro
      - ./portainer-data:/data
    ports:
      - 9000:9000
Save it to any folder and run it in your PowerShell:
docker-compose up -dSwitch to your browser and open http://localhost:9000.
Timing Note: Make sure you log in and create your credentials soon after Portainer is ready, or it will automatically shut down itself for security. If you didn’t create the credentials on time and it shut down automatically, you have to restart the service.
Pros/Cons Of This Solution
Pros
There are multiple advantages compared to the Docker Desktop version:
- The Docker engine is free. So the license update won’t be a problem for your development and production environment.
- Portainer is a production-ready software to manage your Docker environment that also often is used in a server cluster environment.
- You will learn Docker basics much faster and will gain more DevOps competencies.
- Often production environments run in Linux so your development environment comes close to the production environment.
Cons
The only disadvantage for me is that you have to update it manually by yourself instead of pressing an “OK” button if a new version is available.
Closing Notes
Thanks for reading this article!
I hope you enjoyed reading it and are now able to install the Docker environment on your Windows Host within the Ubuntu submodule. Also, I hope that you can now use and install Portainer and Docker Compose on Windows. If it is working for you I would love to get your feedback in the comment section. Also, if you have any questions, please jot them down below. I will answer them if possible.
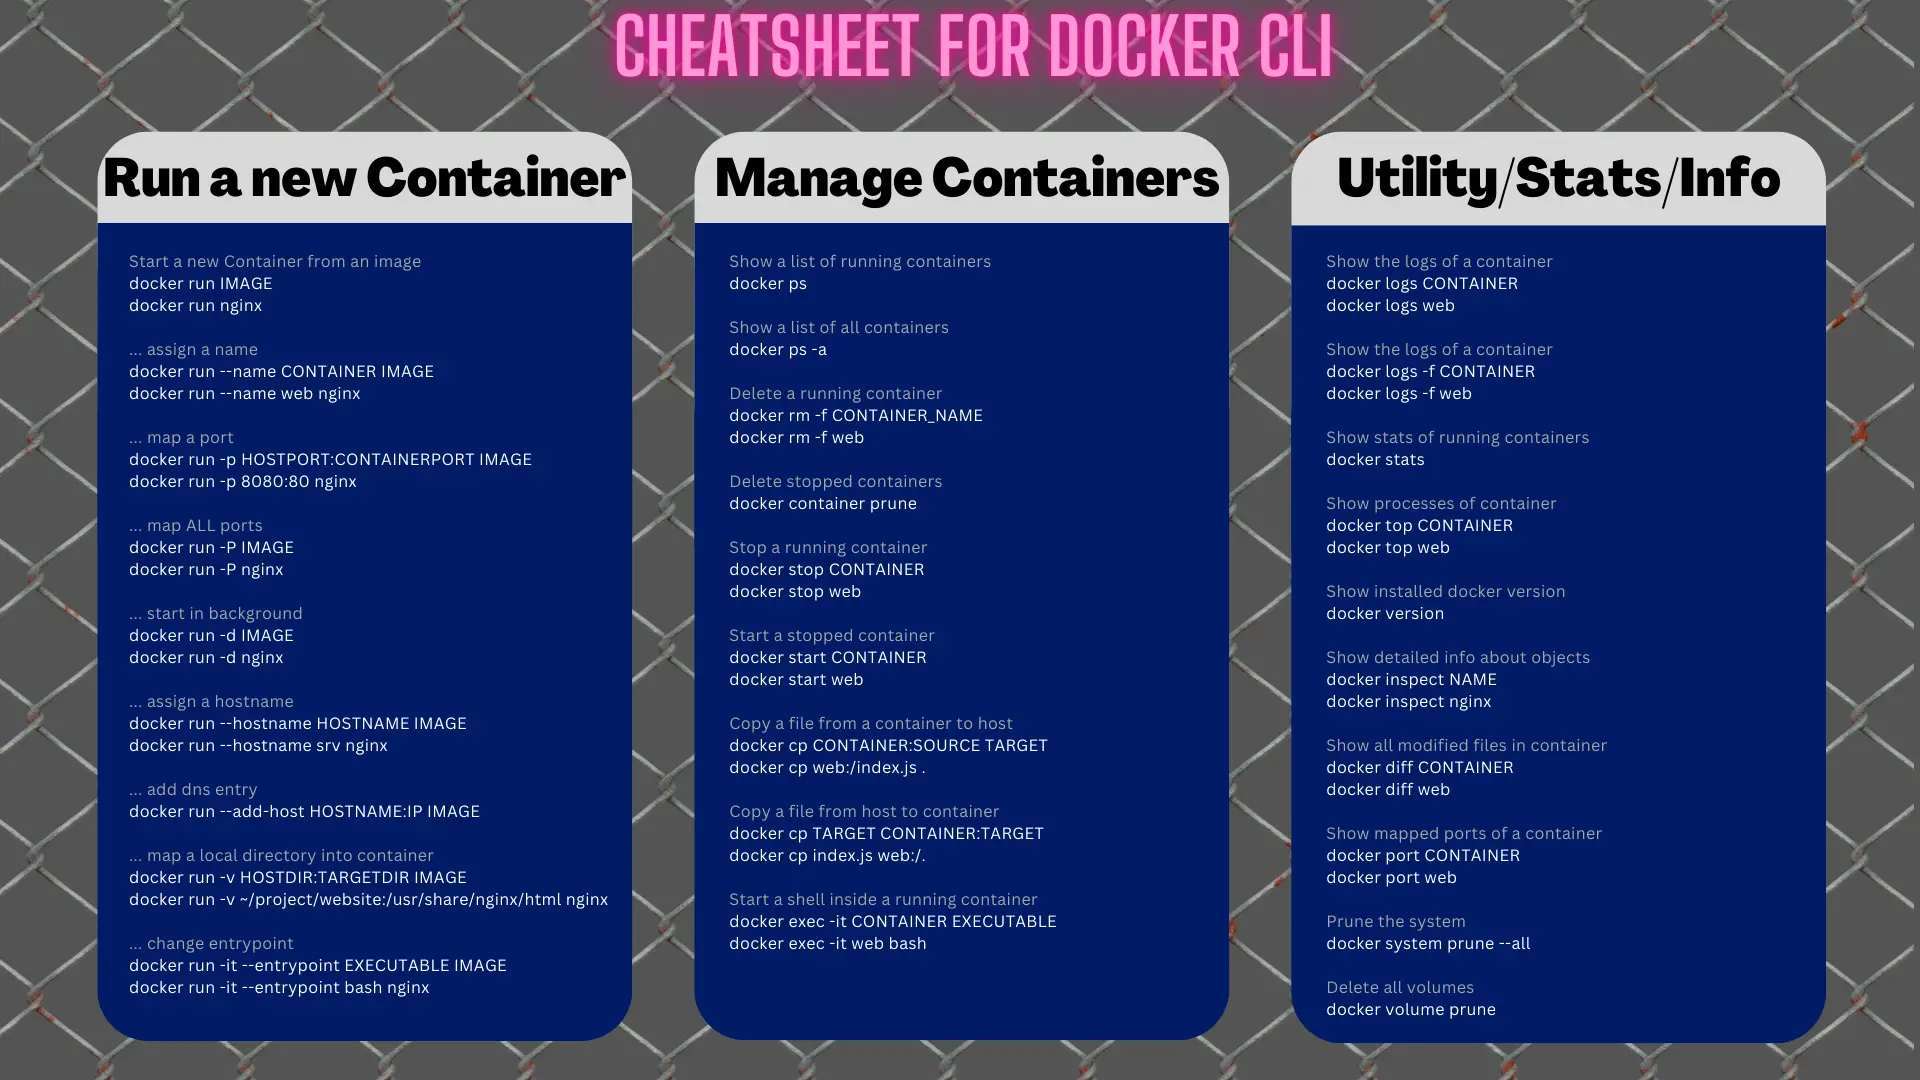
To make working with the Docker CLI easier I created a cheatsheet with many helpful commands:
Feel free to connect with me on Medium, LinkedIn, Twitter, and GitHub.
🙌 Support this content
If you like this content, please consider supporting me. You can share it on social media, buy me a coffee, or become a paid member. Any support helps.
See the contribute page for all (free or paid) ways to say thank you!
Thanks! 🥰