How To Add Comments To Your Blog With Docker
Having Comments On Your Own Blog Is One Of The Most Engaging Features. Learn How To Integrate Isso Comments To Have Privacy-Focused Comment Feature In Your Blog.
Having comments on your blog is one of the most engaging features! Unfortunately, Ghost Blogging Service does not support any comments out of the box. Although they are many different services like Disqus or Discourse which are kind of "free" (they have inbuilt Ads in the "free" version. And Ads are EVIL) there also exist some really free services like Commento, Schnack, CoralProject Talk, and Isso.
I tested all of the free services for my blog and come to the conclusion that Isso is the best service to use in a Ghost Blog. This article will describe why Isso is the best software, how it can be installed in a Docker environment, and how Isso comments can be integrated into any Blog (not only Ghost Blogging software).
Why Isso?
Isso is a commenting server written in Python and JavaScript and aims to be a drop-in replacement for Disqus or Discourse.
It has several features:
- It is a very lightweight commenting system
- Works with Docker Compose
- Uses SQLite because comments are not Big Data!
- A very minimal commenting system with a simple moderation system
- Privacy-first commenting system
- Supports Markdown
- It's free
- Similar to native WordPress comments
- You can Import WordPress or Disqus
- Embed it everywhere in a single JS file; 65kB (20kB gzipped)
All of these features are good reasons to choose Isso as your backend comment system instead of one of the others. If you want to install it in a Docker (or Docker Swarm) environment you can follow my personal guide.
Install Isso Comments With Docker
Prerequisite
- Docker (optional Docker Swarm): To fully follow this tutorial about installing Isso for your blog you need to have a running Docker environment. I will also provide a Docker Swarm file at the end.
- Traefik: Traefik is the load balancer that forwards my request to the Docker container. You need to have one installed to access the comments with an URL. If you do not have a running Traefik you will learn within this tutorial how you can set one up.
If you don't want to use Docker and Traefik please follow the official Installation Guide on the Isso website.
Set Up Docker Compose File
If you prepared everything you start installing Isso. First, you have to download the latest version of Isso from the GitHub page: https://github.com/posativ/isso/. You can either download the zip file containing the master branch and extract it or clone it:
git clone git@github.com:posativ/isso.gitThen switch into the isso folder, delete the docker-compose.yml, create a new docker-compose.yml, and paste the following code snippet into it:
version: "3.4"

services:
  isso:
    build:
      context: .
      dockerfile: Dockerfile
    image: isso
    environment:
      - GID=1000
      - UID=1000
    volumes:
      - db:/db
    networks:
      - traefik-public
    labels:
      - traefik.enable=true
      - traefik.docker.network=traefik-public
      - traefik.constraint-label=traefik-public
      - traefik.http.routers.isso-http.rule=Host(`YOUR_DOMAIN`)
      - traefik.http.routers.isso-http.entrypoints=http
      - traefik.http.routers.isso-http.middlewares=https-redirect
      - traefik.http.routers.isso-https.rule=Host(`YOUR_DOMAIN`)
      - traefik.http.routers.isso-https.entrypoints=https
      - traefik.http.routers.isso-https.tls=true
      - traefik.http.routers.isso-https.tls.certresolver=le
      - traefik.http.services.isso.loadbalancer.server.port=8080
    healthcheck:
      test: wget --no-verbose --tries=1 --spider http://localhost:8080/info || exit 1
      interval: 5s  # short timeout needed during start phase
      retries: 3
      start_period: 5s
      timeout: 3s
volumes:
  db:

networks:
  traefik-public:
    external: true
Within Line 5 - 8 you can see within this Compose file that the Isso image will be built from the Dockerfile that you downloaded from the official GitHub repository and will be named isso.
In Line 12-13 (and 34-35), I defined a volume in which all comments will be saved within an SQLite DB.
The labels section in Line 16 - 27 contains important information for Traefik. Replace YOUR_DOMAIN with the domain where the Isso backend should be accessible. This is important for the moderation of comments.
In Line 28 - 33, I also added a health check that will check every 5s if the Isso backend is running correctly. To learn more about Docker health checks you should read this tutorial:

Configuration of Isso Backend
Before you can run your Isso backend you have to adjust the Isso configuration file to your needs.
The following file shows the most important settings that you HAVE to update in order to have a working Isso backend. I will explain them afterward.
[general]
dbpath = /db/comments.db
host =
    https://www.knulst.de
notify = smtp

[admin]
enabled = true
password = yourSuperSafePasswordThatYouNeedInAdminMenu

[moderation]
enabled = true

[server]
listen = http://localhost:8080
public-endpoint = https://isso.knulst.de

[smtp]
username = YOUR_EMAIL_USER
password = YOUR_EMAIL_USERPASS
host = YOUR_EMAIL_HOST
port = 587
security = starttls
to = USER_WHO_SHOULD_RECEIVE_MAIL
from = YOUR_EMAIL_USER
[general]: Set the dbpath, the URL of your blog, and that you want to get Emails if new comments are submitted
[admin]: Enable administration and set your admin password. This is needed to login into the admin interface.
[moderation]: Enable moderation of new comments. If set to false every comment will be shown instantly. Not recommended!
[server]: Set your public endpoint for your Isso backend. Should be equal to the value within the Compose file.
[smtp]: Set your Email server settings and account data of your Email.
Run Isso Backend
After adjusting the Compose and isso.cfg file to your needs, you can start the Isso backend by executing:
docker-compose up -d --buildAfter some seconds your Isso backend should be running at the specified domain. You can check it by going to https://your-chosen-domain.com/info.
Integrate Isso To Ghost CMS (or any equivalent Blog)
Adjust The Source Code Snippet
Now that you have installed your Isso backend you can integrate comments into your blog. To do this, all you have to do is insert the following snippet in your source code. I will explain how it is done in Ghost Blogging software afterward.
<script data-isso="//isso.knulst.de/" src="//isso.knulst.de/js/embed.min.js"></script>
<section id="isso-thread"></section>
First of all replace isso.knulst.de with the domain, you used with your Isso bac
kend. Furthermore, you should carefully read the source code snippet because there are two important settings:
- The URL in data-isso starts with two
/. - The URL in src also starts with two
/.
If you change the URLs to your needs keep the two / in front of the Isso backend URL. This is needed because the Isso backend is deployed on a different host than the blog.
Add Snippet To Your Page
With the adjusted source code snippet you can now add comments to your blog. If you use the Ghost Blogging platform you should first download the design that you are using on your instance and extract it into a folder.
Locate the post.hbs file and check where the article ends. The best place for comments will be below the Tag List that is often shown at the end of an article. After you found the closing </div> insert the snippet in front of that </div>.
Zip your theme, reupload it to your Ghost Blogging Software, and activate it within the Design interface.
If you use another blogging software you should also be able to edit the post html/php/js file and add the snippet where you want to see comments.
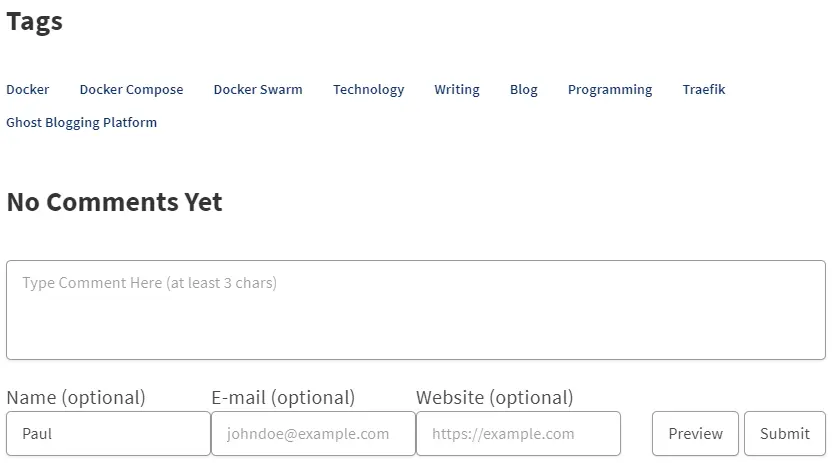
Now, switch to any article on your blog and you should see the comments section:
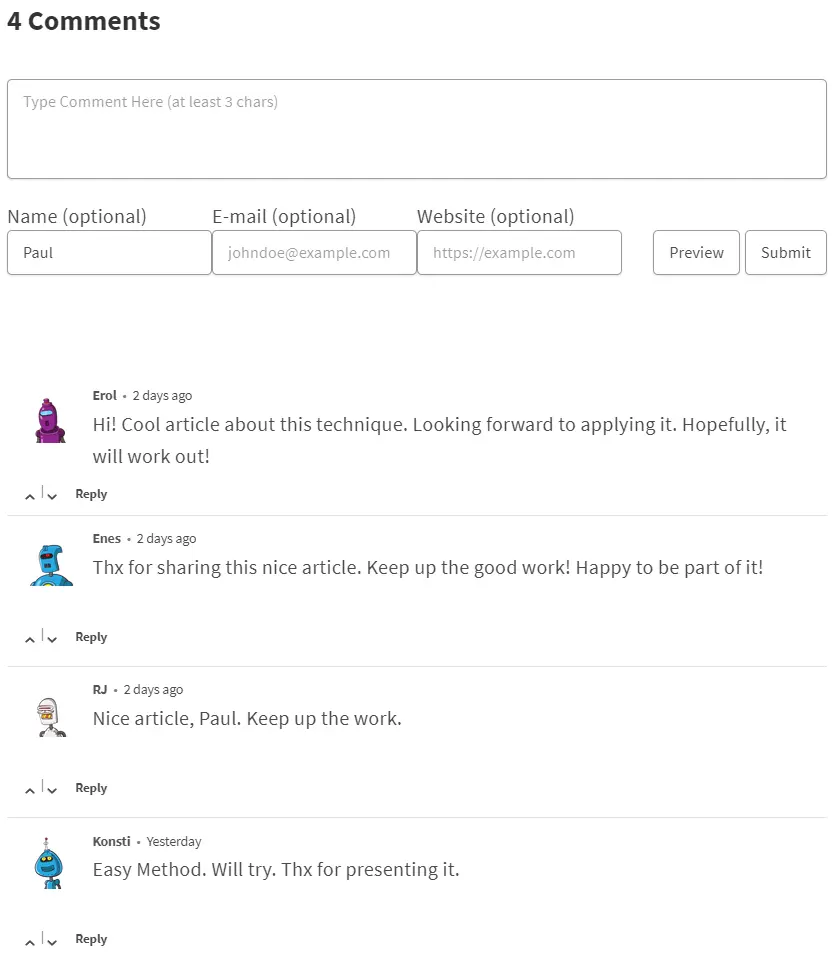
If you set up the Isso backend as I explained in the previous section anyone can now comment on every post and you will be informed by email about a new comment and can instantly activate or delete it within the email:

After getting some cool comments they will be displayed below your post. Because activated the Gravatar feature and set the type to robohash, I have cool robot pictures for every user that creates a comment:
Deploy In Docker Swarm
To deploy Isso into your Docker Swarm you can use my Isso Docker Compose file that has the same settings as the plain Compose file. But, this will only work as intended if you set up your Docker Swarm as I describe in this tutorial:

Furthermore, you need a Traefik Load Balancer in your Docker Swarm that will be used by the Compose file. I explained how to enhance your Docker Swarm with a Traefik in this tutorial:

Closing Notes
While many writers argue that you do not need a comment system integrated into your blog I completely deny this argument! I personally think that comments are a great way to interact with your users, answer questions and build your community. Also, if users comment on your articles you could use this interaction to improve your content.
If you enjoyed reading this article consider commenting your valuable thoughts in the comments section. I would love to hear your feedback about my tutorial. Furthermore, share this article with fellow bloggers to help them get comments on their blogs.
Feel free to connect with me on Medium, LinkedIn, Twitter, and GitHub.
🙌 Support this content
If you like this content, please consider supporting me. You can share it on social media, buy me a coffee, or become a paid member. Any support helps.
See the contribute page for all (free or paid) ways to say thank you!
Thanks! 🥰